Category: Game Guides

In-depth game guides from Game Empress, with walkthroughs, tier lists, location maps, and step-by-step strategies to help you master the games you love.

  • Lighthouse Extracts 2023: How To Escape Safely And Quickly

    Lighthouse Extracts 2023: How To Escape Safely And Quickly

    Although the Lighthouse map has been available in Escape From Tarkov for some time, the community is still finding its feet. Unlike maps like Interchange and Customs, where the community has spent years determining the greatest – and most efficient – areas to plunder, Lighthouse hasn’t been around long enough to reach that point.

    When combined with confusion over extract sites and a new type of adversary, Lighthouse becomes a particularly hazardous terrain for unprepared players. On Lighthouse, going into the incorrect location or failing to discover the proper extract is a quick recipe for death – and with so many other confused players meandering around the new map, calamity is never far away.

    That’s why it’s critical to arrive at Lighthouse with as much preparation as possible – something we’re pleased to assist with. Knowing where every Lighthouse extract is can save your life, but knowing where to avoid it is equally important.

    Whether you’re hoping to complete raids safely on your own or you want to be the teammate whom others trust, check out our Lighthouse preparation suggestions below.

    Escape From Tarkov Maps: Lighthouse Extracts
    Lighthouse Extracts
    Lighthouse Extracts

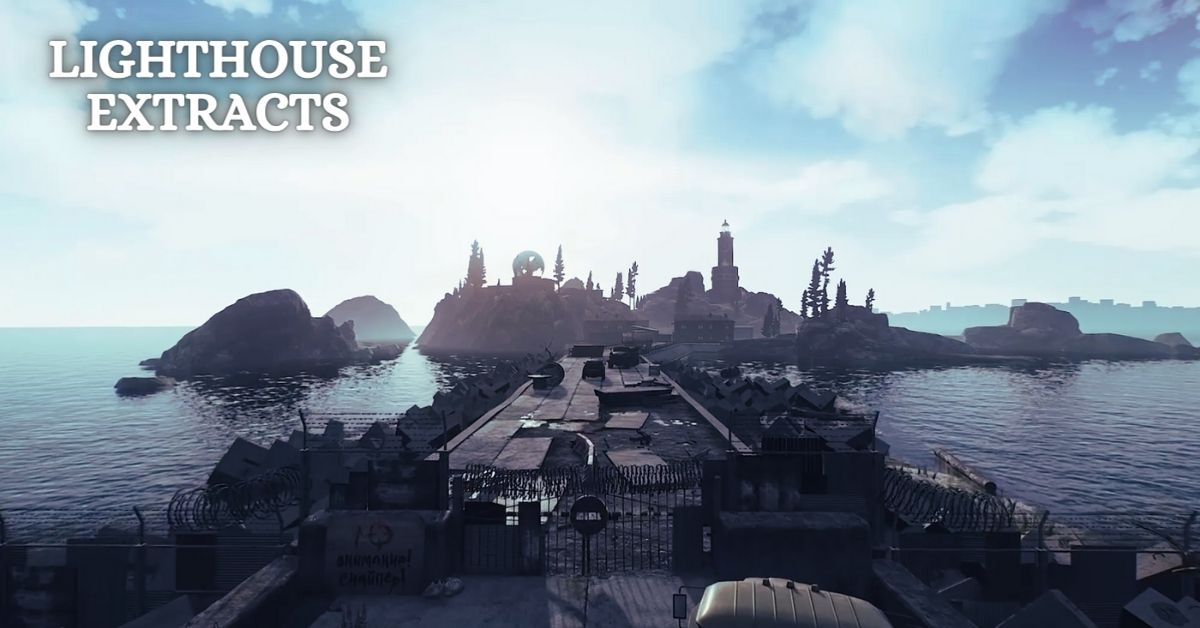
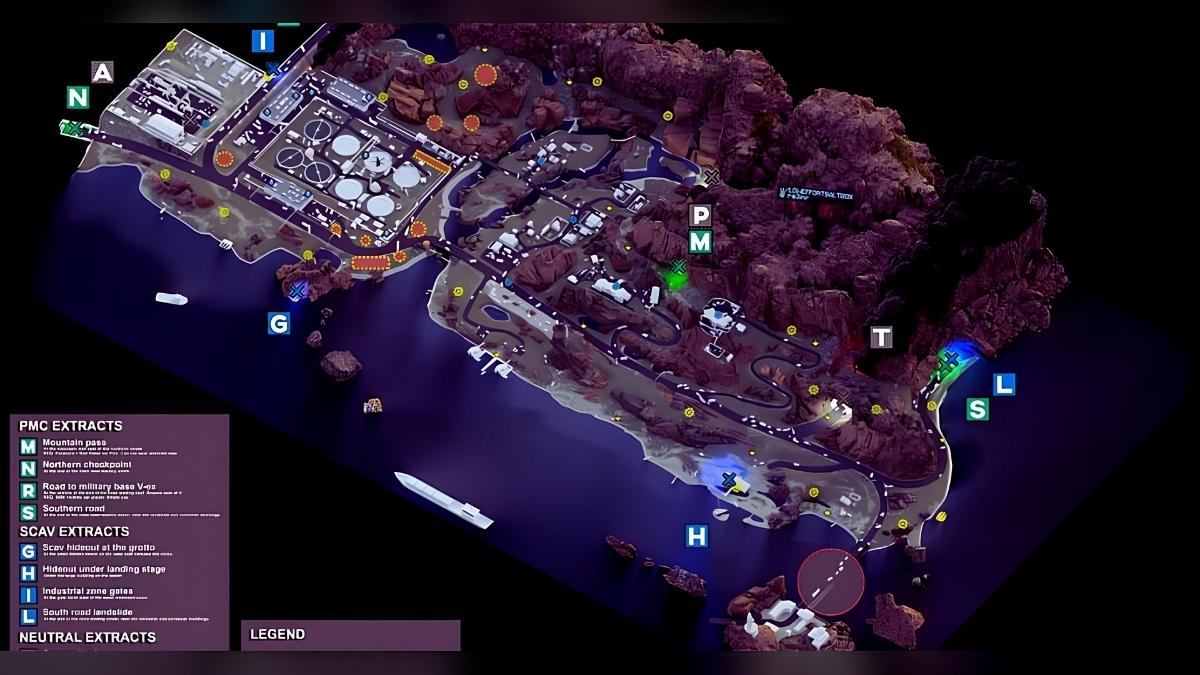
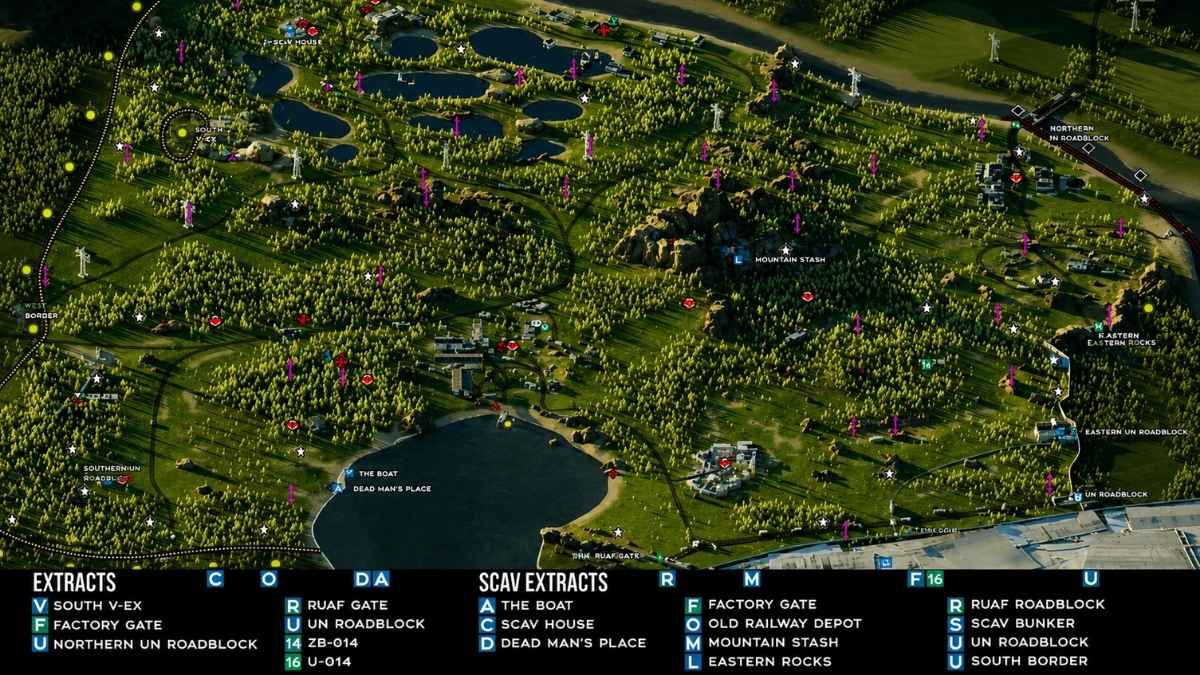
    It goes without saying that if you’re going inside Lighthouse for loot, you’ll need to know how to get out again. What’s the purpose of hunting down all that equipment if you can’t get it out? To avoid missing an extraction or becoming sidetracked in-raid while searching for a route out, make sure you know where your nearest extract is located.

    While you’re learning the loot places, spawns, and extracts, keep a map of the Lighthouse open and ready to help you navigate.

    Fortunately, Lighthouse is pretty liberal with the number of extracts it includes. There are numerous exits to choose from depending on where you spawn; however, some of these require goods to reach.

    The Road To Military Base V-ex costs 5000 Rubles per person to utilize. However, the Mountain Pass extract requires players to bring a paracord, a Red Rebel ice pick, and no armor vest.

    The armored train will arrive between 23 and 28 minutes into each raid and will remain for around seven minutes before departing. Finally, the Side Tunnel extract requires a PMC and Scav to work together to escape the map.

    Beware of the Water Treatment Plant

    If you’ve played Lighthouse before, you’re probably aware that a terrifying new faction of NPC foes now inhabits the Water Treatment Plant. This AI, known as Rogues, is akin to Reserve’s raider group and will represent a far greater threat than typical Scavs seen elsewhere.

    This can be especially difficult for BEAR players – or anyone traveling with a BEAR player – because Rogues will shoot anyone belonging to this group on sight. Because engaging these soldiers is dangerous, it is recommended that BEAR players avoid the Water Treatment Plant if they are not geared up and ready to pick off the Rogues.

    Any USEC players will have an easier time in the region because Rogues will give them many warnings before opening fire. While this isn’t ideal, it allows USEC players a chance to get out of the situation – or at least avoid being mowed down by AI if they get too close to the Plant.

    Learn to Avoid the Landmines

    Lighthouse, like several other maps in Escape From Tarkov, is riddled with land mines. These are found on the map’s northern edge, past the river that divides the Lighthouse into two sections.

    Almost the bulk of the mined sites are in and around the Water Treatment Plant. However, there are some strips of landmines in the mountain pathways to the east, south of the Road To Military Base extract.

    If you’re still unfamiliar with the northern side of Lighthouse, keep an eye out for landmines listed on a map. If you’re under fire and don’t have time to continuously examine a map, a rough rule of thumb is that sticking to main highways will keep you safe from mines.

    Stay Vigilant at the Southern Road Extract

    Unfortunately, extract camping is nothing new in Escape From Tarkov, but some extracts are more deadly than others. One such location is the Southern Road Extract on Lighthouse.

    Approaching the Southern Road pullout can leave a PMC feeling like a sitting duck due to the broad road going up to it and the sloping slopes to the north. Keep your guard up even if your path to safety appears to be close.

    Continue to be attentive – keep an eye out for movement above and ahead of you, try to zig-zag up the road, and prepare your nearest escape route in case gunfire starts flying. Whenever feasible, try to stay on the northern side of the approach to the extract – you’ll be more likely to hear extract campers rustling in the brush, and any snipers waiting in the trees will have a more difficult time aiming at a closer target.

    Don’t Go to the Lighthouse Itself Just Yet

    Blasphemy, I know – the map is literally called Lighthouse, and you’re being urged to avoid it? It’s an obvious target for looting, especially because Battlestate Games COO Nikita Buyanov earlier stated that it would house an exclusive in-game trader.

    Disregard that: the developer has recently confirmed that this version of Lighthouse is not the final version of the map, and certain elements, such as the trader, aren’t even in the game.

    The only thing to be found at Lighthouse right now is a swift death – the approach is guarded by a highly accurate AI sniper who will quickly terminate your raid. In short, there’s no reason to visit the Lighthouse right now, though that will undoubtedly change in the future.

    Cross the Map at a Slower Pace

    Speed is everything in maps like Interchange, where getting to a hotspot first can mean the difference between a graphics card and a capacitor. That technique is more likely to get you murdered in Lighthouse.

    You can’t predict where other (likely lost) PMCs will appear, where players will prioritize loot, or even which way people will move after spawning. Lighthouse is a new map, and gamers are eager to explore it; nevertheless, the community is unpredictable and thus dangerous.

    Reduce your odds of being startled by a random PMC by packing a good headphones and navigating through Lighthouse at a little slower pace than you would in other maps. It pays to be the one in command on a map where people are still scurrying about like headless chickens.

    Don’t sprint around corners, keep your ears open for movement, and don’t let your guard down in the map’s quieter parts. With those six strategies, you should be well-equipped for more tremendous success in Lighthouse.

    Don’t be disappointed if you find yourself dying a lot: thoroughly learning a map takes a long time, and as we mentioned above, Lighthouse is significantly more deadly than most maps right now. If you’re becoming frustrated, take a break and run some raids on a map you’re more comfortable with – often, all you need is a short break before diving back in.

    Considering this, we suggest checking out our guide on Halo Infinite Season 5 Release Date for the latest info on the game’s editions and modes. Stay connected with GameEmpress to get the latest news and guides about the gaming world.

  • Escape From Tarkov Maps 2023: The Ultimate List

    Escape From Tarkov Maps 2023: The Ultimate List

    Escape From Tarkov is, at its core, one of the most challenging games ever created. It’s a borderline Milsim title with severe PvPvE warfare designed to test a player’s limits. From the intricate weight and health management systems to the realistic weapon physics, it’s no surprise that Escape From Tarkov has a reputation for being a challenging game.

    Escape From Tarkov Maps

    In Escape From Tarkov, players explore multiple maps while looting, shooting, and completing objectives in a war-torn world. However, not every map is as tricky as the next, with some including somewhat easier layouts, opponent spawning, and extracts – spots where a player can depart the map once finished.

    escape from tarkov maps
    escape from tarkov maps

    The Lab

    The Lab is the most challenging map in Escape From Tarkov. It’s difficult to even get into, needing a keycard that only allows a player entrance once before they must track down or purchase another keycard. Once on the map, the player will be constrained by a highly protected environment, with the best stuff concealed behind closed doors.

    There are no scans in The Lab. However, Raiders can spawn, which are fierce, sophisticated, scat-like adversaries with razor-sharp shooting abilities. It’s a PvP battlefield unlike any other, encouraging players to massacre one another for the greatest treasure, and with multiple floors and a difficult-to-understand architecture, it’s not at all hospitable to beginner players. If a PMC finds itself loading into The Lab, it must be prepared for a fierce battle.

    Lighthouse

    Lighthouse is one of Tarkov’s newest maps, having been released toward the end of 2021. It’s a big, sprawling setting with an industrial zone, a long beach, chalets, and impenetrable forests that are difficult to comprehend and conquer. There are numerous exfil sites, but they can be challenging to locate and can spawn some of the game’s most formidable foes.

    There are lots of formidable foes to get into a fight with, from being a place frequented by The Goons – a trio of boss-like enemies – to boasting a community of Rogues. As of 2023, there is a new boss, Zryachiy, and the level is littered with landmines, challenging open spaces, and vicious scars. Lighthouse has a lot of chores to perform, but it doesn’t make it any less dangerous for even the most experienced gamers.

    Reserve

    The reserve is an abandoned military base stocked with extreme hardware and home to one of the game’s most difficult bosses. It’s a frightening environment with well-trained and capable adversaries known as Raiders – essentially advanced scans. Almost every extraction site on the map has limits, and it’s a popular spot for campers and ‘rat-style’ players.

    If a player does nothing but complete their responsibilities, they will take a long time to achieve Reserve. When they do, practically any assignment can be deemed problematic, providing distinct scenarios that go beyond simply eliminating scans in specific locations throughout the battlefield. It’s difficult, frightening, and absolutely not hospitable to newcomers.

    Interchange

    Even though it’s not difficult to learn how to use, Interchange is a relatively dangerous map. It’s a dark, dense setting that appears to encourage player-vs.-player fighting, and there’s a challenging boss – Killa – who can spawn practically anywhere on the map, making his actions incredibly difficult to predict.

    Interchange is a challenging map, with scars that appear out of nowhere and a long drive to most extraction sites. There are specific locations on the map where players will congregate as soon they enter, which can end a conflict in minutes.

    Furthermore, with a combination of long and short sight lines, it’s challenging to determine what kind of weapon a PMC should use, particularly if they’re a new player.

    Shoreline

    Shoreline is a challenging, wide-open setting with a competent boss, a spawn spot for The Goons – a trio of bosses – and some of the best opportunities to combat players. The resort is a ‘central place’ on the map where practically every player will be fighting for the best prizes.

    Numerous early-game missions will send players to Shoreline early on, but it can be a daunting map. Due to the open nature of the field, the battle is frequently ended in a matter of seconds, with players being picked off as they cross significant gaps between cover. Extraction sites are generally easy to spot. However, they are pretty far away from where a player will naturally find themselves plundering.

    Streets of Tarkov

    Streets of Tarkov is the game’s most recent map, having debuted with the 0.13 update in December 2022. It’s a densely packed metropolitan setting, full of stores, residential buildings, hotels, and broad, winding avenues filled with abandoned automobiles and trams. It doesn’t appear very comforting at first, but the map isn’t all that challenging.

    Killa and Gluhar are two bosses that can spawn on the Streets of Tarkov. However, their spawn rates are relatively low. Streets of Tarkov is an easy map to comprehend because all of the extraction sites are positioned along the game’s perimeter – even if a player gets lost, they may skirt the map’s edge and, chances are, they’ll find one. Streets of Tarkov is tricky – because it’s new, of course – but it’s not impossible. It has more treasure places than any other map and plenty of cover and buildings to lose other players in.

    Woods

    Woods is another early-game map that players will discover when they begin their trip. It’s one of the most significant maps in Escape From Tarkov, with huge open fields, woodlands, and some critical areas of interest that provide excellent looting and shooting possibilities.

    While there is a relatively tricky fight on Woods, he does not spawn very frequently and only appears in one spot. Aside from the scans that roam the map, there are few risks, as the immensity of the map makes colliding with other players uncommon. However, due to the map’s design, there are only a few areas worth visiting, which can lead to battle choke points. It’s a vast map, and players may struggle to learn it at first, making it a little more complicated.

    Customs

    Customs is the ‘welcome map’ in the game for many Escape From Tarkov gamers. It’s where many of the first jobs and objectives can be done, and it’s a generally harsh setting. It’s a vast map, yet it’s straightforward to master the layout in a short amount of time. There are a few spots of interest that provide fascinating battle scenarios, but it’s ultimately where most Tarkov gamers start their trip.

    Customs, for the most part, is a constant in the lives of all Tarkov players throughout the game. It’s a map that can be revisited at any level, and it may be both profitable and beneficial to fast-rising through the ranks. There’s a boss on Customs that doesn’t appear very often, but he’s regarded as one of the easiest to defeat in the entire game.

    Factory

    Despite being expanded a long time ago, Factory is the oldest and smallest map in Escape From Tarkov. It’s a small-form world with a short play style that encourages players to jump right into player-vs-player combat.

    Despite having a terrifying opponent and tons of dark, dreary hallways, Factory is really the most accessible map in Escape From Tarkov to master. There’s almost no loot to be obtained, the extracts are easy to find, and the map’s rapid-fire structure means players will only be in it for a few minutes at a time. It’s an excellent map for honing combat abilities, as that’s all there is to do there.

    Considering this, we suggest checking out our Overwatch 2 Season 7 Release Date for the latest info on the game’s editions and modes. Stay connected with GameEmpress to get the latest news and guides about the gaming world.
  • All BitLife Prison Escapes Guide 2023: How To Escape From Any Prison

    All BitLife Prison Escapes Guide 2023: How To Escape From Any Prison

    This article will teach you all you need to know about escaping any Bitlife prison or jail map. There are also jails in the game if you choose the wrong path and break the law. There are low to medium-security prisons, maximum-security prisons, and normal-security prisons.

    You will be sentenced to prison based on the offense you commit. However, no one likes being locked up in either of these locations, so you’ll want to get out. However, getting out of jail is not easy. This is why we’ve included all of Bitlife’s jail maps and escape routes.

    All Bitlife Prison Escapes

    How To Escape Prison In BitLife
    How To Escape Prison In BitLife

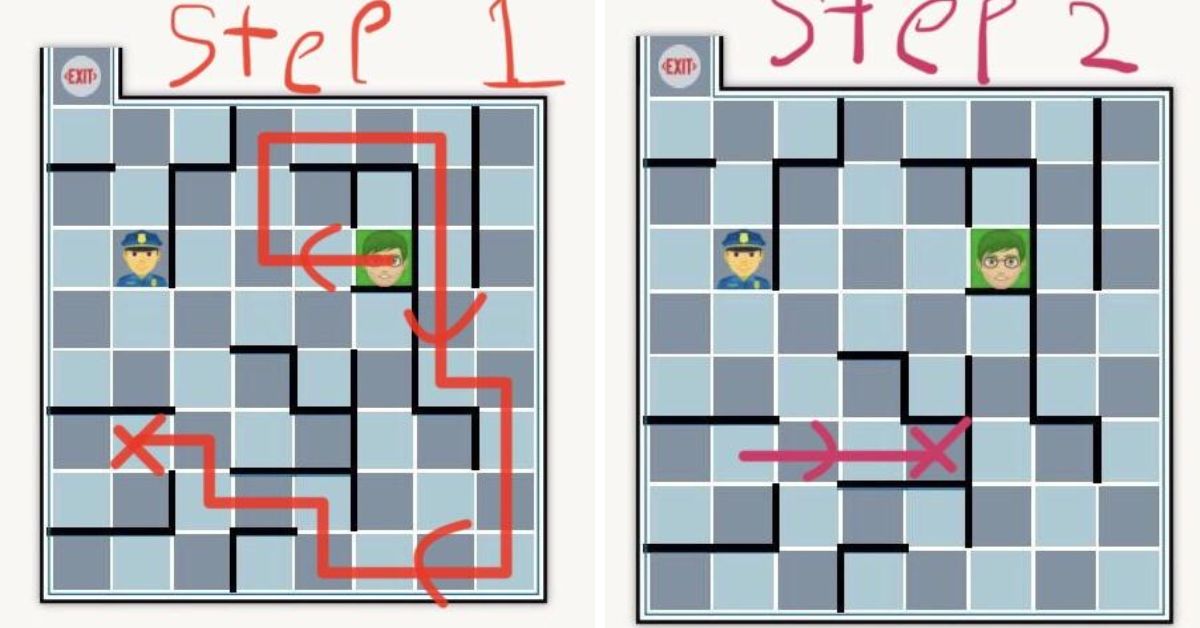
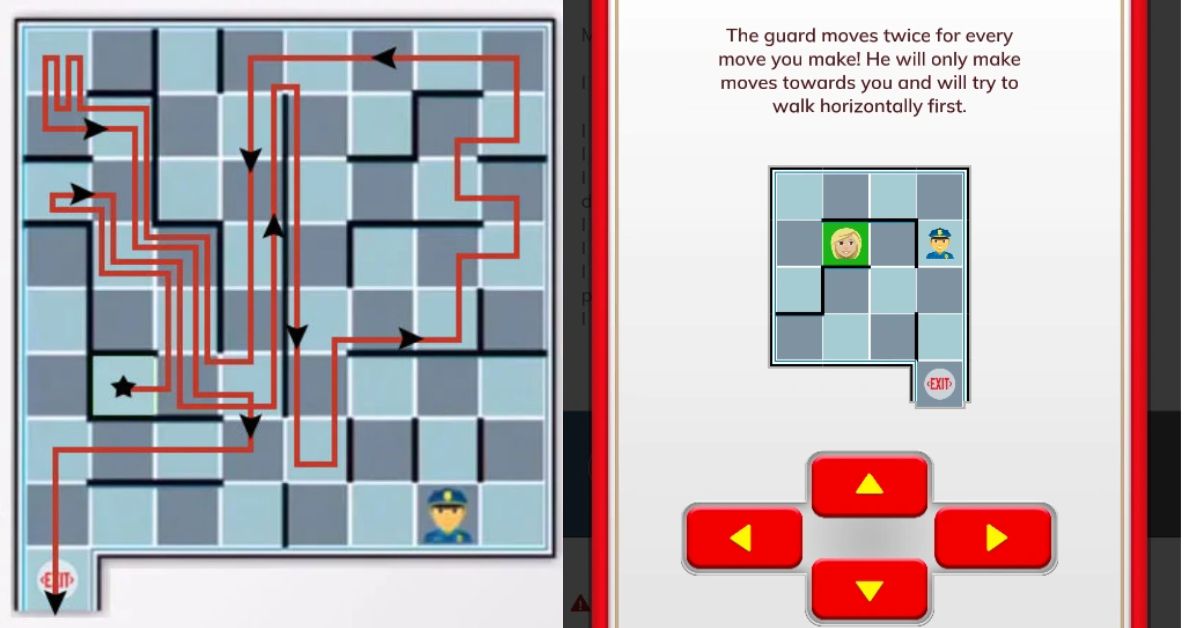
    Here’s how to get out of jail in Bitlife:

    • Both you and another security guard are on the grid.
      He’ll move twice as fast as you do.
      He will not just make two moves in any direction; instead, he will begin horizontally and proceed toward you.
    • If the guard notices you attempting to flee, they will add a few years to your sentence for attempting to flee.
    • In BitLife, you must block the security guard in the maze walls so that he cannot walk as freely.
    • There will be three-sided boxes in Bitlife’s jail where he can get stuck, and you can rapidly get to the way out.

    In Bitlife, How Many Riots Are Required to Free Prisoners?

    When it comes to riots, it’s less about how many there are and more about how many detainees players can capture. It will reveal how many prisoners are required to create a riot at the top. This number will rise with each riot started by the player.

    Players can escape from a jail map at any time, but notably after a riot. Riots, on the other hand, can only occur once a year, and if the player fails to initiate one, other convicts will likely beat them up.

    Players who are attacked by these attacks will lose health and may be charged if they run into a guard. If the player is caught attempting to cause a riot, they may face a heavier term.

    It’s not the best technique to get out of jail, but it’s possible that gamers are hunting for this approach in order to receive a special award. Getting away during a fight in BitLife is completely random. Therefore, players who pick this strategy are taking a big risk. However, if you want a unique title, it may be worth the effort.

    Conclusion

    That is our how-to escape prison in the Bitlife game guide, and we hope you found all of the answers to your questions. Now it’s your chance to escape prison in Bitlife and enhance your gameplay or level. Thank you for reading this How to Escape Prison in Bitlife article, and please share your ideas in the comments below.

    Considering this, we suggest checking out our guide on Overwatch 2 Season 7 Release Date for the latest info on the game’s editions and modes. Stay connected with GameEmpress to get the latest news and guides about the gaming world.
  • Tricky Doors Walkthrough Level 14: Escaping Santa House!

    Tricky Doors Walkthrough Level 14: Escaping Santa House!

    Here’s a step-by-step approach to completing the Tricky Doors tutorial level 14 puzzle game, Santa’s House. Each level/chapter of the popular puzzle game Tricky Doors places players in a different locale. The goal of the game is to escape the room by solving several mini-puzzles and discovering objects in the rooms that will assist you.

    This game is free to play and can be downloaded and played on the Nintendo Switch, Android, and iOS devices. There are still new levels being released, and we will do our best to develop walkthroughs/guides to assist you in completing the areas you may be stuck on as soon as possible. This article will show you how to complete the game’s fourteenth level, Santa’s House.

    As you can see from the start screen, the latest version includes a holiday theme as well as some mini-games.

    Tricky Doors Walkthrough Level 14 Santa’s house

    If you go into Level 14, you’ll find yourself in the middle of a strange and fun Santa’s House. What’s your job? You have to figure out the puzzles that are in your way and get to the next mysterious level 1. Let’s break down the steps you need to take to figure out what’s going on in Santa’s House.

    tricky doors walkthrough level 14

    Gathering Essential Items

    1. Collecting Reindeer Figurines:
    • Initially, tap the broom at the back left corner of the room, and then on the chandelier lights on the ceiling to knock down a reindeer figurine.
    • Next, head towards the chair on the right covered with a blanket. Move the blanket to reveal a silver wire and the second reindeer figurine tangled in the chair. Collect them both.

    Unlocking the Central Mystery

    1. Solving the Chest Puzzle:
    • Proceed to the large chest in the room’s center. Add the two reindeer figurines to the lock, which will then unveil a puzzle.
    • This puzzle requires moving colored disks using the empty spaces on the wheels to match the disks with the corresponding colored backgrounds.

    Exploring the Courtyard

    1. Venturing Outdoors:
    • After solving the chest puzzle, collect a key from inside, which will unlock the door on the right leading you to a quaint courtyard.
    • In this outdoor space, check the snowman to obtain an Empty Cauldron, some Firewood, and a Bulb. Also, grab some more firewood from near a red cabinet and a red postbox in the courtyard.

    Solving the Santa’s House Post Box and Barn Door Puzzles

    1. Engaging with More Puzzles:
    • Inside the red postbox, use the wire to unlock another puzzle. The objective here is to fit the shapes into the corresponding spaces on the right.
    • Additionally, add a carved figurine found in the postbox to a panel near a large barn door to reveal yet another puzzle, where you’re required to arrange pieces so the rows match the colors or symbols on the sides.

    Check out our other very simple gaming guides:

    Final Steps Towards Freedom

    1. Entering the Barn and Returning to the House:
    • Upon solving the barn door puzzle, enter the barn, collect some essential items, and return to the house.
    • Back in the house, rearrange some items under a desk to find matches, and use a carved decor item on a cupboard door to reveal the final puzzle. Solve this to finally escape Santa’s House.

    Your tenacity and wit, coupled with this guide, will surely see you through the end of Level 14. Should you need more visual aids, some online sources provide video walkthroughs for an even clearer understanding of the steps. Now, onto the next enigmatic level, and may the puzzles ahead be ever in your favor!

    Santa’s House, the fanciful voyage of Tricky Doors Level 14, unveils a fascinating blend of challenge and discovery. As players progress through the charming yet perplexing environment, each mini-puzzle solved brings them one step closer to freedom. This guide deciphers the cryptic attraction of Santa’s House, ensuring a smooth cruise into the next mystery lying in Tricky Doors. The promise of fresh, more exciting challenges attracts inquiring minds as periodic upgrades expand the experience.

    Thanks for choosing Game Empress as your information hub! We’re committed to providing you with top-notch content.

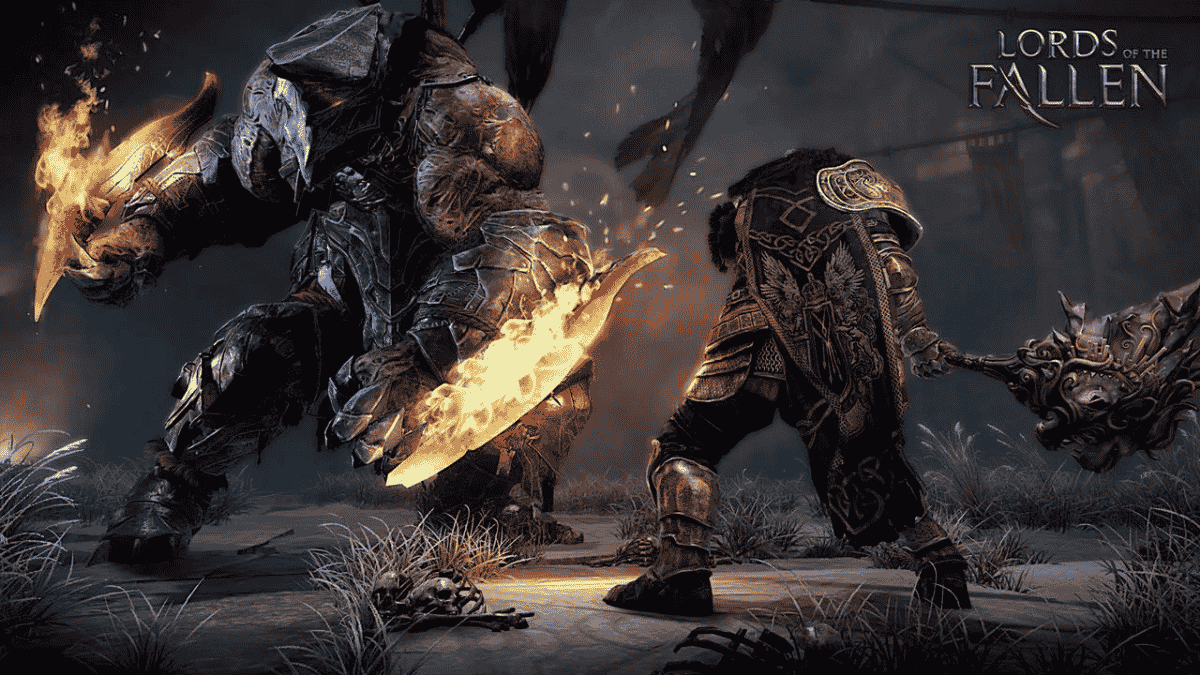
  • Lords Of The Fallen 2 Gameplay (2023): A New Era Of Soulslikes Begins

    Lords Of The Fallen 2 Gameplay (2023): A New Era Of Soulslikes Begins

    As Lords of the Fallen 2 approaches its release date, Souls and Soulslike fans eagerly await its arrival. But how long can this much-anticipated sequel keep players absorbed in its dark and complex world? We have the information you need, whether you want a general estimate of the significant storyline or a thorough completionist run.

    Lords of the Fallen 2, which will be released in October, is a sequel to the 2014 game of the same name. This 2023 incarnation, created by HEXWORKS, continues the story over a thousand years later, with the events of the original game having developed into legendary tales.

    The game introduces a fresh protagonist who starts on a risky trip across Mournstead’s foreboding land. If you’re wondering how long your adventure through Mournstead will take, here’s all you need to know about the game’s length and Lords Of The Fallen 2 Gameplay:

    How Long Is Lords of the Fallen 2?

    Lords of the Fallen 2 Release Date
    Lords of the Fallen 2 Release Date

    Lords of the Fallen 2 is projected to take roughly 30 hours to complete a single playthrough. During a recent interview, the game’s Executive Producer, Saul Gascon, and Creative Director, Cezar Virtosu, verified this. Gascon stated that the development crew, who are well-versed in the game, took roughly 25 hours to complete.

    This time, however, incorporates their extensive understanding of the game, such as enemy spawn sites and strategies. New players might expect to spend more time playing.

    The game is very replayable, with several endings to find. The game’s duration is increased by the fact that players can experience three alternative endings depending on which groups they align with.

    Furthermore, the inclusion of numerous character classes allows for the exploration of diverse character builds and playstyles.

    Is Lords of the Fallen Getting a New Game Plus?

    Lords of the Fallen has a New Game Plus mode for those looking for a more in-depth experience. This option lets players embark on a more difficult trip while keeping all of their character characteristics and items from prior playthroughs.

    As a result, completionists should expect a much lengthier experience, much beyond the original 30 hours of gameplay.

    Lords of the Fallen, with its intriguing story, demanding gameplay, and rich replay value, promises to provide gamers with a substantial and engaging gaming experience when it releases this October. Prepare to enter Mournstead and face its difficult trials.

    What is the Point of Playing Lords of the Fallen 2?

    To unwind? No. To relax? Hardly. To have a good time? What about hurling yourself into wave after wave of crushing opponents only to get slaughtered again and again? Do people like to climb Mount Everest? Do people want to land on the moon? They do it to experience the excitement of CONQUEST. OF SUCCESS. CONQUERING THE IMPOSSIBLE ODDS.

    They do it to develop character. If you play video games, your father likely believes you lack character. It’s time to disprove him.

    This is everything you need to know about Lords of the Fallen Gameplay. Additionally, you can check our guide on the Gotham Knights Gameplay. Stay connected with GameEmpress to get the latest news and guides about the gaming world.

  • GTA V Map: Navigating The Criminal Haven!

    GTA V Map: Navigating The Criminal Haven!

    With Grand Theft Auto V (GTA V), players can become part of the criminal underworld on the game’s huge, highly detailed map. Not only is the game’s map very big, but it’s also very full of things to do and tasks to complete, which keeps players interested.

    This piece takes a close look at the GTA V map and talks about its interesting places, features, and possible connections to the real world.

    Overview of GTA V Map

    The map of GTA V includes the made-up state of San Andreas, which is based in Southern California. The state’s capital city is Los Santos, which is a parody of Los Angeles. Urban areas, beaches, farmlands, deserts, and hilly terrains are just some of the places on the map that make it interesting for the criminal adventures in the game.

    GTA V Map
    GTA V Map

    Notable Locations on the GTA V Map

    • Los Santos: The bustling heart of San Andreas, mirroring the glam and grit of Los Angeles with its skyscrapers, slums, and everything in between.
    • Vinewood: A take on Hollywood, this area is home to the entertainment elite and features the iconic Vinewood Sign.
    • Sandy Shores: A desert town that portrays the rougher, rural side of San Andreas.
    • Paleto Bay: A quaint town nestled between the mountains and the sea, showcasing a peaceful facade amidst the chaotic world of GTA V.

    Features of the GTA V Map

    The GTA V map is laden with features that contribute to the immersive gameplay:

    • Interactive Locations: Various establishments like shops, clubs, and garages are interactive, allowing players to engage in different activities.
    • Hidden Collectibles: Scattered around the map are collectibles like letter scraps and spaceship parts, encouraging exploration.
    • Dynamic Events: Random events like carjackings and police chases occur throughout the map, keeping the gameplay spontaneous and exciting.

    Comparing GTA V Map to the Real World

    The similarities between the map of Grand Theft Auto V and the actual world are so striking that it’s hard to believe they’re not genuine. Many of the game’s locations are strikingly similar to real-life areas in Southern California. The presence of this realism improves the gaming experience by giving the impression that the criminal fantasy is more founded in reality and more believable.

    You might also like to read these other GTA-related articles:

    Comparison of GTA V to Earlier Versions of the Game

    The Grand Theft Auto V map is noticeably larger and more detailed than the maps of its predecessors, which is illustrative of the development of game design and technology over the course of the past few decades. The addition of submerged exploration is a significant improvement that brings a fresh perspective to the universe of the game.

    The GTA V map is a work of art. It brings together parts from real life and the imagination to create a truly unique gaming world. The GTA V map is full of interesting places to visit, things you can do, and events that change all the time. It makes every trip into the game’s criminal world feel like a new journey.

    Your interest in our website is greatly appreciated! Make Game Empress your go-to source for tech-related knowledge.

  • Gotham Knights Gameplay (2023): Open World Exploration And Combat

    Gotham Knights Gameplay (2023): Open World Exploration And Combat

    A new Gotham Knights gameplay reveals the game’s day-night cycle and dramatic villainous events. Players will be able to handle Batgirl, Robin, Nightwing, and Red Hood as they protect Gotham alone or with a multiplayer partner in the open-world superhero simulator.

    Gotham Knights gameplay videos have focused on the game’s combat system and RPG features, and now a new video discusses the game’s open-world principles.

    Gotham Knights, developed by WB Games Montreal, will allow players to become Gotham’s newest protector following Batman’s untimely demise. Each of the game’s four playable characters will have unique skills and playstyles, and RPG aspects will allow players to further customize the experience with powers and gear.

    Red Hood, for example, is a close-range brawler with ranged weaponry, while Nightwing uses swift, acrobatic melee attacks. The core plot of Gotham Knights will revolve around the secretive Court of Owls organization, but other villains will also come to wreak havoc on Gotham in the absence of the Dark Knight.

    Gotham Knights, for example, will include Harley Quinn as a boss, and supervillain encounters will reportedly have a lasting impression on the city.

    IGN has posted a new Gotham Knights gameplay video to YouTube, revealing fresh insights about the superhero simulator’s open-world framework. The game will now take place across several nights rather than just one, with players returning to the Belfry hub during the day.

    This will make the environment feel much more immersive, with stories unfolding over multiple nights. Crimes in-game range from procedurally generated muggings to large-scale bank heists, and investigations can alert players to impending crimes.

    Gotham Knights will also feature significant Villain Night events that will take over a night and demand the player’s attention by modifying the game world.

    Gotham Knights Gameplay

    Gotham Knights Update
    Gotham Knights Update

    As the revived Red Hood and the acrobatic Nightwing go about their crime-fighting business in Gotham’s weary streets, game director Geoff Ellenor walks us through the gameplay. Let’s go over some of the most intriguing portions of film available:

    Combat

    We get an excellent sense of what Gotham Knights will be like, thanks to Nightwing and Red Hood. Nightwing’s combat is all-around momentum, so bouncing between foes and using speed to crowd control are all part of the game.

    Red Hood employs non-lethal firearms (yeah, okay) to pepper burst-fire rounds at foes, as well as the ability to lay (presumably non-lethal) grenades and explosives on enemies, which can be detonated on the spur of the moment to deal more significant damage to groups of thugs.

    Both vigilantes may work together to deliver beatdowns on foes, and it appears that keeping incoming goons away while working together to tackle more immediate dangers will be the essential element of the game here.

    Given that there are visible damage statistics (which you can turn off) and more RPG components in the game, it feels like this will play more like Marvel’s Avengers than prior Arkham games. Is this a positive development? No, in my opinion. But there’s only so much you can analyze without actually holding the book.

    Traversal

    We get an excellent sense of what Gotham Knights will be like, thanks to Nightwing and Red Hood. Nightwing’s combat is all-around momentum, so bouncing between foes and using speed to crowd control are all part of the game.

    Red Hood employs non-lethal firearms (yeah, okay) to pepper burst-fire rounds at foes, as well as the ability to lay (presumably non-lethal) grenades and explosives on enemies, which can be detonated on the spur of the moment to deal more significant damage to groups of thugs.

    Both vigilantes may work together to deliver beatdowns on foes, and it appears that keeping incoming goons away while working together to tackle more immediate dangers will be the essential element of the game here.

    Given that there are visible damage statistics (which you can turn off) and more RPG components in the game, it feels like this will play more like Marvel’s Avengers than prior Arkham games. Is this a positive development? No, in my opinion. But there’s only so much you can analyze without actually holding the book.

    Crafting

    Destiny has a lot of things to answer for. The menu UI appears to be a cross between Destiny and Diablo, complete with tiered colors for exotic and rare goods and resources that appear to have been ripped wholesale from the Season of the Taken or something.

    What follows is standard fare for anything like this: atomized stats, crafting tabs, modding tabs, the ability to disassemble whatever suit you’ve constructed, and nodes for upgrades and chips.

    We had anticipated that the game’s customizing would be more akin to, say, Injustice 2 – where you can add modular sections to the armor – but instead, it appears to be primarily wholesale costumes and looks that you can swap for different resistances and benefits.

    Given this, we recommend visiting our Blue Protocol Release Date 2023 page for the most up-to-date information on the game’s editions and modes. Stay up to date with GameEmpress for the most recent gaming news and guides.

  • Simple Helicopter Cheat Gta 5 For Pc, Xbox, PlayStation!

    Simple Helicopter Cheat Gta 5 For Pc, Xbox, PlayStation!

    Grand Theft Auto V (GTA 5) is a world of criminal dreams where the sky is truly the limit, especially when a helicopter can be spawned with simply a cheat code. The game’s expansive and vibrant metropolis is a treat to view from above, and what better way to do so than in your own helicopter?

    A helicopter might be your best friend when it comes to dodging the cops or simply taking a picturesque tour across Los Santos. This tutorial reveals the GTA 5 helicopter trick to help you conquer the skies!

    Helicopter Cheat Gta 5: How to Use the Helicopter Cheat?

    In GTA 5, activating the helicopter cheat is a simple process. You simply enter a code, and a helicopter emerges, ready for your soaring adventures. The cheat codes differ based on the platform. Here’s how to use cheats to spawn a helicopter on many platforms:

    • For PC:
      • Buzzard Attack Helicopter: Type “BUZZOFF” or use the phone and dial 1-999-289-9633.
    • For Xbox 360/Xbox One:
      • Buzzard Attack Helicopter: Press B, B, LB, B, B, B, LB, LT, RB, Y, B, Y.
    • For PS3/PS4:
      • Buzzard Attack Helicopter: Press Circle, Circle, L1, Circle, Circle, Circle, L1, L2, R1, Triangle, Circle, Triangle.

    Remember, cheats can disable achievements and trophies, so use them wisely.

    When to Use the Helicopter Cheat

    The helicopter cheat comes in handy when you’re stuck or just want to see Los Santos from above. There are a few times when a chopper could be useful:

    Evading the Law: If the police are following you, a quick escape in a chopper can save your life.

    Scenic Tours: Fly over the game’s beautiful cities and forests to enjoy their beauty.

    Quick Travels: Cut down on the time it takes to get around the huge GTA 5 map.

    Mission Advantages: In difficult tasks, get a better view or a way to get out.

    Helicopter Cheat Gta 5
    Helicopter Cheat Gta 5

    You might also like to read about these other GTA articles:

    Other Airborne Cheats in GTA

    Aside from the helicopter, GTA 5 includes cheats that allow you to spawn various flying vehicles for when you want a different type of air adventure. Some examples are:

    Planes in GTA

    Stunt Plane: For PC, input “BARNSTORM,” for Xbox, type BARNSTORM. LB (right) Left LT RB LB LB Left Left A Y for Xbox, and Right Left R1 R1 Left R1 L1 R2 L1 for PlayStation.

    Duster Plane: On the PC, type “FLYSPRAY,” on the Xbox, Right Left RB RB RB Left Y Y A B LB LB, and on the PlayStation, Right Left R1 R1 R1 Left Triangle Triangle X Circle. L1 L1.

    Jetpack in GTA

    Unfortunately, there is no method to spawn a jetpack in GTA 5. However, there are mods available online that can add a jetpack to your arsenal of aerial vehicles.

    The helicopter cheat in GTA 5 is a fast and fun way to take over the air over Los Santos. A trick code can be used to easily call up a helicopter, whether you’re trying to avoid police or just want to cruise above the city. The sky is the limit in GTA 5’s exciting open world, where you can choose from more than just cars. So get ready to fly and see the game from a different point of view!

    We’re glad you found value in our content! Stay connected with Game Empress to explore more informative articles.

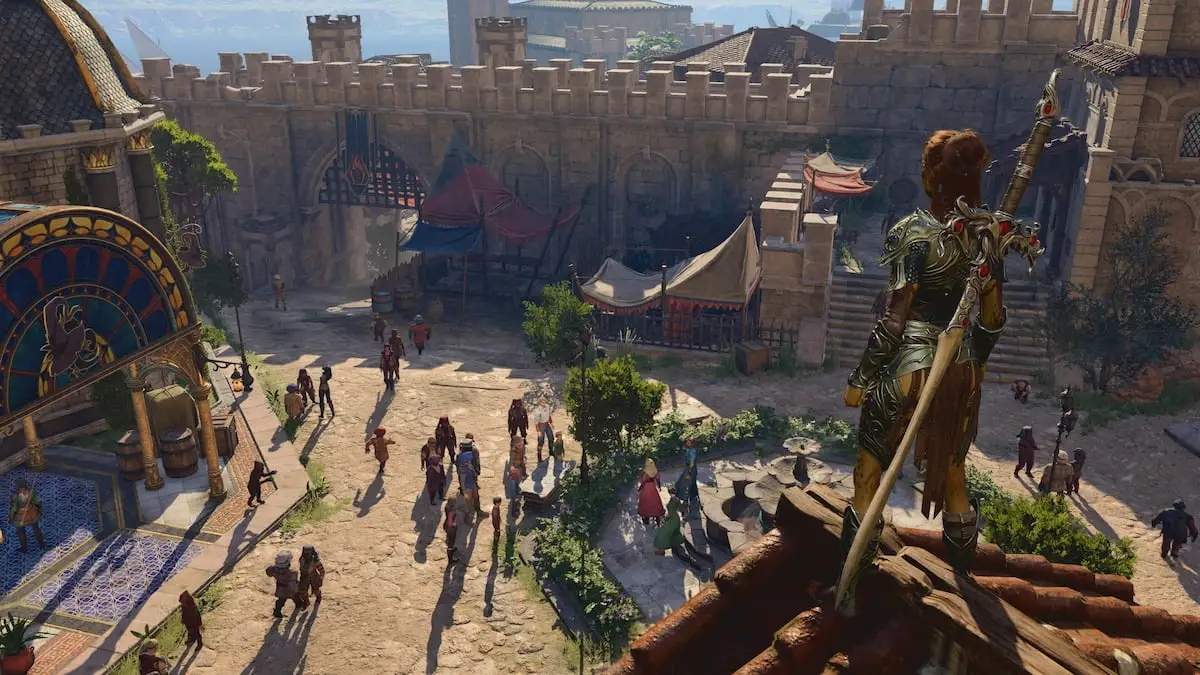
  • Baldur Gate 3 Gameplay (2023): The Best Tips And Tricks

    Baldur Gate 3 Gameplay (2023): The Best Tips And Tricks

    Baldur’s Gate 3 is a story-driven role-playing game created and distributed by Larian Studios. The third game in the Balder’s Gate series, as the name suggests, and the story structure and gaming mechanics are all based on the Dungeons & Dragons tabletop RPG system.

    It is an isometric game in which players can rotate and zoom in on the camera from all sides to acquire a complete picture of their surroundings. Exploration and puzzle-solving take place in real time, but when fighting, the game slows down to turn-based combat.

    Baldur Gate 3 Gameplay

    Hardcore players are no strangers to challenge runs in their favorite games, especially when it comes to games like Baldur’s Gate 3, which features a robust system rife with the potential to build crazy challenging encounters with equally complicated means of defeating them.

    Baldur Gate 3 Gameplay
    Baldur Gate 3 Gameplay

    Baldur’s Gate 3 distinguishes itself from the usual RPG experience with more rigid systems that Larian Studios broadened enough to permit tactical finesse.

    With Larian Studios known for Divinity: Original Sin 2 and its highly flexible combat system, Baldur’s Gate 3 gamers are aware that they can bypass the game’s broader narrative and focus solely on its exciting fighting.

    However, what hurdles may players impose on their Baldur’s Gate run to put their tactical skills to the test?

    No Offense

    Unlike other RPGs, Baldur’s Gate 3 allows players to interact with a Face Character built primarily for fun. A Face Character is created in D&D and other TTRPGs to serve as the party’s spokesperson, with enough Charisma and points in conversational Skills (Deception, Intimidation, Persuasion, Performance) to talk their way out of (or into) trouble.

    In the No Offense challenge, players are urged to create a character who can get out of sticky situations as much as possible.

    While some talks conclude in nothing but battle, players should be aware that every interaction that can lead to non-combat should be pursued at all times.

    In this challenge, players can reload saves as many times as they like to choose the least violent alternative, exploring whether there is indeed a way to avoid having to kill their way out of removing the Illithid parasites in their heads.

    Unknown Hirelings

    When players unlock Withers in Baldur’s Gate 3, they can respec their characters, restore dead Companions, and even hire Hirelings. Rather than playing with Companions who have their storylines and themes, players can experiment with Hirelings who can be hired at a lower cost.

    One challenge with Hirelings is to complete an entire playthrough using just Hirelings. A possible arrangement for this challenge would be for players to receive their first Companions and then not advance through the main story until they unlock Withers, earn enough gold, and fill their party with Hirelings.

    With so many side missions and locales to explore in Act 1, players may have a fully-equipped Hireling group to continue the game.

    The Lone Wolf Play

    Players who enjoyed Larian Studios’ previous title, Divinity: Original Sin 2, will recall the “Lone Wolf” Talent, which is essentially a perk that enhances a character’s stats if they play alone or with only one friend.

    This fosters tremendous tactical prowess on the part of the player, mainly because they are outnumbered in the majority of the game’s encounters. In a player’s Baldur’s Gate 3 playthrough, this is the case with the Lone Wolf Play.

    This challenge, similar to the “Lone Wolf,” pushes players to rely on their character’s prowess to take on the majority of the game’s confrontations alone.

    This can quickly become challenging, especially as players are nearly always outnumbered at the start. Players can approach this task by using hyper-optimized builds with a lot of crowd control options or by using clever hits-and-runs.

    Deadly Melee

    Melee combat is essential in Baldur’s Gate 3, especially as all monsters can equip both long-ranged and close-ranged weapon options. Close-ranged specialists like the Fighter and Barbarian are also must-haves as tanks, thanks to their ability to pull off high-damage rolls with weapons like Versatile Weapons.

    The Deadly Melee challenge focuses on this specialization, as it forces participants only to employ melee attacks. Spells that buff or heal allies could be cast from afar, but debuffs and status effects could not. However, players can make the battle more intriguing by only allowing spells that influence melee.

    Ranged Delight

    Baldur’s Gate 3 gameplay now allows characters to switch between melee and ranged weapons as needed, thanks to quick-swap options. Even melee specialists can try their hand at attacking from afar if enemies try to flee while still possessing Movement to outmaneuver foes.

    Players searching for a challenge, on the other hand, should choose Ranged Delight. This requires players to attack from a distance, regardless of their Class or whether they are wielding a spell. Players can spice things up by mandating that all characters utilize ranged weapons.

    Considering this, we suggest checking out our Blox Fruit Update 20 Release Date 2023 for the latest info on the game’s editions and modes. Stay connected with GameEmpress to get the latest news and guides about the gaming world.

  • Johnny Cage Combos MK1: How To Combo Like A Pro

    Johnny Cage Combos MK1: How To Combo Like A Pro

    You may dominate bouts with swift follow-up attacks by using the finest Johnny Cage combos in Mortal Kombat 1. Cage has returned in MK1, and he has some of the strongest moves in this new era.

    Lord Liu Kang has not yet built his way to possessing his super green type of magic, but he remains one of the best characters to employ in Mortal Kombat 1. Here are some simple and intermediate combos that you can do with Johnny Cage in MK1.

    Best Johnny Cage Combos MK1

    • Knuckle Under The Buckle: 1 – 1 – 2
    • Kontacted Kick: Forward – 1 – 1 – 4
    • Under The Table: Forward – 1 – 2 – 3
    • Back To The Footure: Forward – 1 – 2 – 4
    • Ducking On Haters: 2 – 1 – 2
    • Legbanged RedemptShin: 2 – 1 – 4
    • Foot Loosey Goosey: 2 – 1 – 4 – 4
    • Footless: Back + 3
    • Elbow Before Me: Forward + 3 – 2
    • On The Chin: Forward + 3 – 2 – 1

    Special Moves:

    • Ball Buster: Back – Down – 1
    • Show Off: Down – Back – 1
    • Rising Star: Down – Back – 3
    • Shadow Kick: Back – Forward – 4
    • Shadow Dash: Down – Back – 3
    • Throwing Shade: Forward – Down – Back – 2
    • Star Meter Activation: Forward – Down – Back – 4

    As you can see, Johnny Cage possesses a wide range of attacks and basic combos that are ideal for doing the greatest damage. Johnny, on the other hand, is not as easy to master as Kung Lao. This means that in order to learn to deal 40% damage with Cage, you must have the patience to click numerous buttons one after the other.

    This is while Johnny, who is unique to this character, has a star meter beside the amplified gauges. This star power will fill up once you do enough taunts by pressing down 4 times or hitting LT/L2 after you’ve hit the target with a Shadow Kick.’

    When you’ve got your star ready, press forward – down – back – 4, and a spotlight will appear over Johnny’s head, hyping him up to do more damage!

    Johnny Cage Advanced Combos in MK1

    Bouncer

    Forward + 1 – 2 – 4 * (Dash) Back + 3 * (Dash) Forward – 1 – 2 – 4

    Some of Johnny Cage’s finest combos begin with a bounce. In fact, Johnny Cage is a master of the bounce! His combos conclude in an overhead, causing your opponent to bounce and become helpless to your assault.

    In this advanced combo, for example, you’d need to do a Back To The Footure to bounce the other fighter. Then, to dash, double-tap the forward button and perform a Footless. If you’re quick enough, you’ll be able to finish the combo with another BTTF.

    Double Bounce

    Forward + 2 – 1 – 2 * (Dash) Back + 3 * Forward – 1 – 2 – 4

    This combo is identical to the previous one and deals almost the same amount of damage. To begin, perform a standard Ducking On Haters sequence. Then, run forward and land a Footless on your opponent. Finally, completing the combo with a BTTF. These two are the bread and butter of Johnny Cage’s finest advanced combos in Mortal Kombat 1, and if you learn them properly, you can accomplish more combinations.

    Into The Shadow Kick

    Forward + 2 – 1 – 2 * (Dash) Forward – 2 – 1 – 1 * (Dash)  Forward – 1 * Back – Forward – 4 + RT/R2

    Cage’s Shadow Kick is one of his returning special moves, and it’s a great way to break up combinations. When magnified, this special move deals 110 damage to your opponents, and you can taunt them by pressing LT at the end to fill your star gauge.

    However, the best you can accomplish with this kick is to use it as a finisher for the best Johnny Cage advanced combinations in Mortal Kombat 1, such as the one shown above.

    This is everything you need to know about Johnny Cage Combos MK1. Additionally, you can check our guide on Remnant 2 Invader Build Guide. Stay connected with GameEmpress.com to get the latest news and updates about the gaming world.

  • Monster Hunter Now Weapon Guide: Choose The Right Weapon For Your Playstyle

    Monster Hunter Now Weapon Guide: Choose The Right Weapon For Your Playstyle

    Monster Hunter Now allows players to face massive creatures with six legendary Capcom weapons. Initially limited to Sword and Shield, you’ll soon get access to weapons ranging from the quick Long Sword to the mighty Great Sword. With only 75 seconds to kill enemies that become more difficult as you continue, weapon selection is critical.

    While all guns have advantages, some plainly outperform others, which is essential for rapid hunts and events. This tier list lists Monster Hunter Now’s weapons from strongest to weakest, with the strongest being the best to avoid.

    When faced with frightening animals, having the appropriate weapon can spell the difference between failure and success. Use this as a guide to help you select the best weapons to improve your gaming experience.

    Monster Hunter Now Weapon Guide

    While employing the most incredible Monster Hunter Now weapons will not instantaneously make you the best player, they will give you a significant advantage when facing the game’s most fearsome opponents. In fact, if you manufacture weapons from the list below, you’ll find it much easier to complete hunts and Urgent Quests.

    Monster Hunter Now Release Date
    Monster Hunter Now Release Date

    Sword And Shield

    Monster Hunter Now’s default melee weapon is a sword and Shield. This adaptable beginning set strikes a mix between offensive and defense. You’ll be quick on your feet, evading and maneuvering to attack.

    Upgrading to Grade 2 unlocks the Special Skill Perfect Rush Combo, which allows you to chain hits. Sword and Shield follows you through Chapter 1, giving you plenty of opportunity to master its flowing combos.

    Though eventually outperformed by better gear, the damage output and mobility of this weapon make it perfect for beginners. Its forgiving gameplay allows for practice and mastery of fundamental mechanics versus early opponents.

    Sword and Shield provides rookie hunters with a solid, well-rounded basis on which to build their monster-slaying abilities. Stick with this tried-and-true weapon until your skills improve before moving on to more flashy ones.

    Great Sword

    The Great Sword sacrifices mobility in exchange for tremendous power. Charged blows with this ponderous melee weapon deal a lot of damage. However, the protracted build-up leaves you exposed. Monsters can strike quickly while you prepare lethal blows.

    With little free daily healing and few restoratives available, the high-risk, high-reward Great Sword is becoming less practical. Because of the frequent need to avoid and reposition, this weapon’s slow strikes and delayed recovery make it less useful against more agile enemies.

    Other possibilities are more useful in the current meta of action RPGs. More mobile damage dealers are safer bets for hunters until the developers increase the Great Sword’s speed or extend healing options. Consider using this weapon only if you can successfully evade and attack through narrow gaps.

    Light Bowgun

    The Light Bowgun allows hunters to fire bullets at monsters from a safe distance. Each crafted Bowgun uses a different type of ammo, so choose your weapons wisely based on your quarry.

    Aim to target sensitive bodily regions while keeping a safe distance. The Special Skill Wyvernblast Counter is ideal for delivering powerful blows. The Light Bowgun’s strength, however, is its mobility. Light Bowguns are superb precision tools with proper preparation and knowledge of monster weaknesses.

    To demolish your massive adversaries, keep your distance, dodge properly, and employ skilled marksmanship.

    Bow

    The Bow provides hunters with medium-range offensive capability. You’ll be strafing circular creatures with various arrow types and charge levels. Stay close to your target to connect accurate hits. You must perfect evasion because dodging is essential for avoiding harm in close quarters.

    The Dragon Piercer Special Skill of the Bow fires a deadly piercing arrow that penetrates enemies for enormous damage. Though not as weighty as heavy weapons, bows have less ammo and need more repositioning than light-ranged choices. Bubbles can be pretty effective with the correct elemental arrows and Dragon Piercers.

    However, expect to be mobile and never stagnant. Bows, in general, add balanced power, mobility, and tactical concerns to Monsters Hunter Now.

    Hammer

    The Hammer is great for smashing monsters. However, it is slow. This heavyweight melee weapon crushes pieces in order to obtain bonus materials at the expense of maneuverability.

    Hammering up close gives little space for error. If you don’t study monster movements and attacks before tackling this beast, you’ll be stuck alongside creatures. For Hammer users, precise timing takes the place of agility.

    After dealing massive damage, the Spinning Bludgeon Special Skill adds flair. Overall, with the Hammer’s high-risk, high-reward strategy, mastering monster behavior is critical. Consider developing talents to boost evasion and compensate for decreased mobility.

    Patience and practice pay off, transforming enemies into loot pietas for adept Hammer wielders. However, there will be a high learning curve before you’re shattering skulls with this giant.

    Long Sword

    The Long Sword is the finest weapon in Monster Hunter Now right now. It is ideal for fast-paced hunters who enjoy showy strikes. This melee weapon can perform quick, precise combos. Landing hits replenish your Spirit Gauge, which grants damage bonuses until you take damage.

    Mastering the Long Sword necessitates maintaining combinations and the Spirit Gauge aggressively. However, fluid slash chains and the aerial Spirit Helm Breaker Special Skill deliver massive damage.

    Overall, the fashionable Long Sword rewards patient, skilled players with consistent attacks. However, it is more challenging to learn than beginner weapons such as Sword and shield, Light Bowgun, and Bow.

    To maximize combinations, regulate the Spirit Gauge, and time the Spirit Helm Breaker, expect a learning curve. The Long Sword’s elegant strokes make hunting a stunning skill once trained. Prepare to put this subtle, high-risk, high-reward playstyle to the test.

    This is everything you need to know about Monster Hunter Now Weapon Guide. Additionally, you can check our guide on Fortnite Aimbot Guide. Stay connected with GameEmpress to get the latest news and updates about the gaming world.

  • Best Fortnite Controller Settings 2023: Dominate Your Opponents

    Best Fortnite Controller Settings 2023: Dominate Your Opponents

    Have you ever wondered how some of the best Fortnite controller players keep up with the best mouse and keyboard players? The controller settings they select are critical in gaining an advantage over the competitors, letting them construct faster and aim more reliably.

    Let’s take a look at the finest Fortnite controller settings for better aim, construction, and movement.

    Best Fortnite Controller Settings

    It’s rather common to find millions of active Fortnite gamers every day. This is due to the fact that the game is available on nearly every platform, including PC, Playstation, Xbox, Nintendo Switch, and mobile devices.

    Best Fortnite Controller Settings
    Best Fortnite Controller Settings

    It’s also a plus that Fortnite offers cross-platform support and that you can link all of your accounts to a single Epic Games account.

    We have not forgotten about you if you play the game on the PlayStation 5 or Xbox Series X/S. Even those who play the game on a PC with controllers should make these changes.

    Aside from the map modifications brought about by the Chapter 4 Season 1 update, you will have to adapt to the updates, such as making the sprint permanent or gaining special powers.

    Here are the optimal Fortnite controller settings for PS4 and Xbox One that we have tested and confirmed since the start of the new season:

    Controller Options- Input

    • Controller Auto-Run – On
    • Build Immediately (Builder Pro) – On
    • Edit Hold Time – 0.100 Seconds
    • Slide Hold Time – 0.100 Seconds
    • Reset Camera Axes – Pitch
    • Reset Camera Time – 0.100 Seconds
    • Vibration – Off

    Controller Options- Sensitivity

    • Look Sensitivity – 7 (Fast)
    • Aim Sensitivity (Ads) – 7 (Fast)
    • Build Mode Sensitivity Multiplayer – 2.0x
    • Edit Mode Sensitivity Multiplayer – 2.1x
    • Use Advanced Options – On

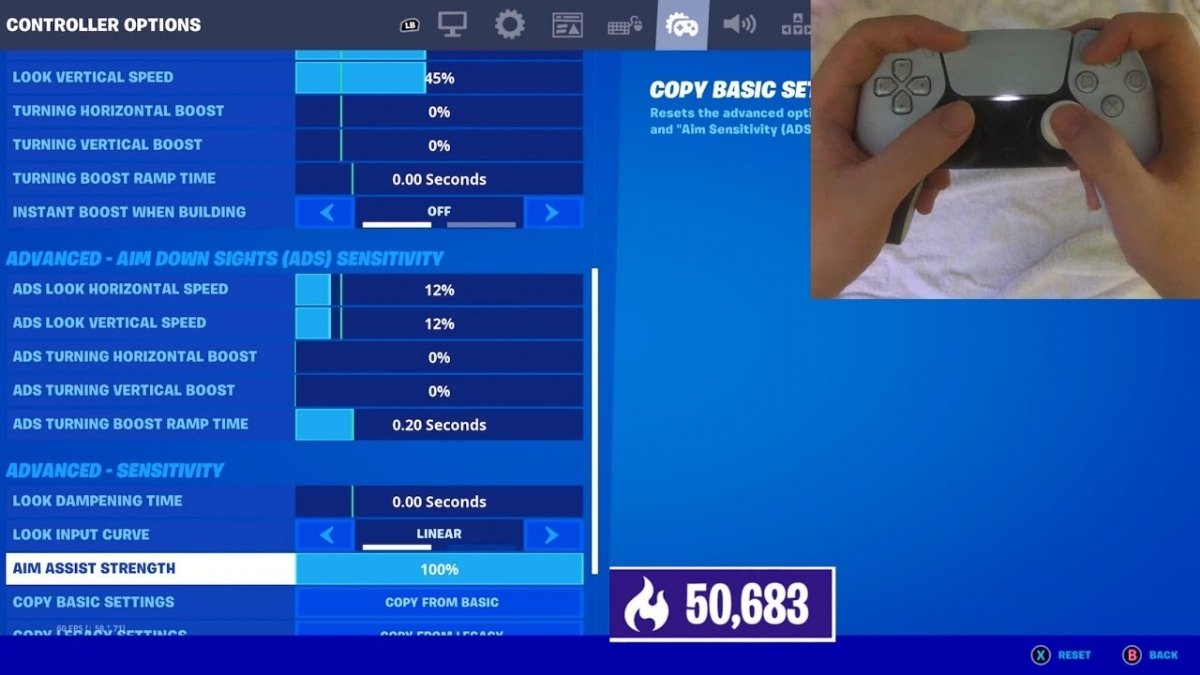
    Controller Options- Advanced- Look Sensitivity

    • Look Horizontal Speed – %40
    • Look Vertical Speed – %40
    • Turning Horizontal Boost – %0
    • Turning Vertical Boost – %0
    • Turning Boost Ramp Time – 0.00 Seconds
    • Instant Boost When Building – Off

    Controller Options – Advanced- Aim Down Sights (ADS) Sensitivity

    • ADS Look Horizontal Speed – %8
    • ADS Look Vertical Speed – %8
    • ADS Turning Horizontal Boost – %0
    • ADS Turning Vertical Boost – %0
    • ADS Turning Boost Ramp Time – 0.00 Seconds

    Controller Options- Advanced- Sensitivity

    • Look Dampening Time – 0.00 Seconds
    • Look Input Curve – Exponential
    • Aim Assist Strength – %100

    Controller Options- Controller Deadzone

    • Left Stick Deadzone – %5
    • Right Stick Deadzone – %5

    Controller Options- Foot Controller

    • Enable Foot Controller – On
    • Foot Controller Deadzone – %1
    • Foot Controller Max Throttle – %1

    How to Change Fortnite Controller Settings

    On practically all platforms, Epic Games uses the same design for Fortnite’s interface and menu system. This enables gamers to swiftly adapt to the new system, even if they switch platforms.

    Here’s how to adjust the controller settings in Fortnite:

    1. In the main menu or while playing, go to Settings.
    2. Then, proceed to the tabs.
    3. Open the fifth or sixth row, which is indicated by the controller icon.
    4. All controller settings can be altered here.

    After modifying the settings, remember to save before closing it. For the controller settings to take effect, you do not need to restart Fortnite.

    That’s all we have for now on the optimum controller settings for Fortnite on Playstation/Xbox. Although there are minor differences between the two systems, the settings we shared are applicable to both. As always, test the settings and make any necessary adjustments.

  • Crazy Fox Free Spins: How to Get Crazy Fox Free Spins?

    Crazy Fox Free Spins: How to Get Crazy Fox Free Spins?

    Crazy Fox Spin is an online game that is very simple to play and offers its players the possibility of winning free spins. It’s really satisfying to witness all of the buildings and structures slowly and steadily rising, as well as the quick expansion of your society.

    Crazy Fox featured a slew of new, super-exciting features, propelling it to the top of the list of the greatest and most popular mobile games. Free spins for coin master

    How to Get Crazy Fox Free Spins?

    There are a few ways available to you if you want to acquire some free spins. Signing up for the Crazy Fox email list or following Crazy Fox on social media will also get you free coins. Finally, you can earn free spins by performing tasks or collecting extra coins from the app.

    Crazy Fox Free Spins
    Crazy Fox Free Spins

    Keep an eye on the Crazy Fox Facebook, Twitter, and Instagram pages since they frequently publish codes that can be redeemed for free coins. Inviting friends can result in free incentives. The Crazy Fox game is available on Google Play for Android and the Apple App Store.

    Where to Use Crazy Fox Free Spins?

    With crazy fox-free spins, you can do a number of things. To begin with, you can use them to play slots at Crazy Fox Live. You decide! Some players like to save their free spins and spend a lot of money with them, while others would instead use them more wisely to play for longer. You decide how to use your free spins in the end, so have fun and enjoy the game.

    Let’s take a look at these other simple gaming guides:

    How Do I Redeem Crazy Fox Free Spins?

    It’s really simple to get these daily prizes in Crazy Fox. Things have changed, though. Developers of Crazy Fox no longer send out links to click on; they also send out codes that can be used in the app. Here’s what you need to do to use the codes:

    • Open the menu and go to the settings option.
    • At the bottom right, there is a ‘Redeem’ button – click this.
    • Enter each code one at a time in the box, and hit Redeem.

    That’s it! The free spins and coins will be added to your account right away.

    Crazy Fox, a simple but fun online game, lets players gain free spins and watch their society flourish. Its fascinating new features make it a popular mobile game. Free spins can be earned by signing up for emails, following Crazy Fox on social media, or performing in-game activities. Players can choose how to use these spins in Crazy Fox Live slots. Entering app codes instead of link-clicking to redeem free spins makes daily incentives easy.

  • Subnautica Aurora Codes: Dive Into the Unknown!

    Subnautica Aurora Codes: Dive Into the Unknown!

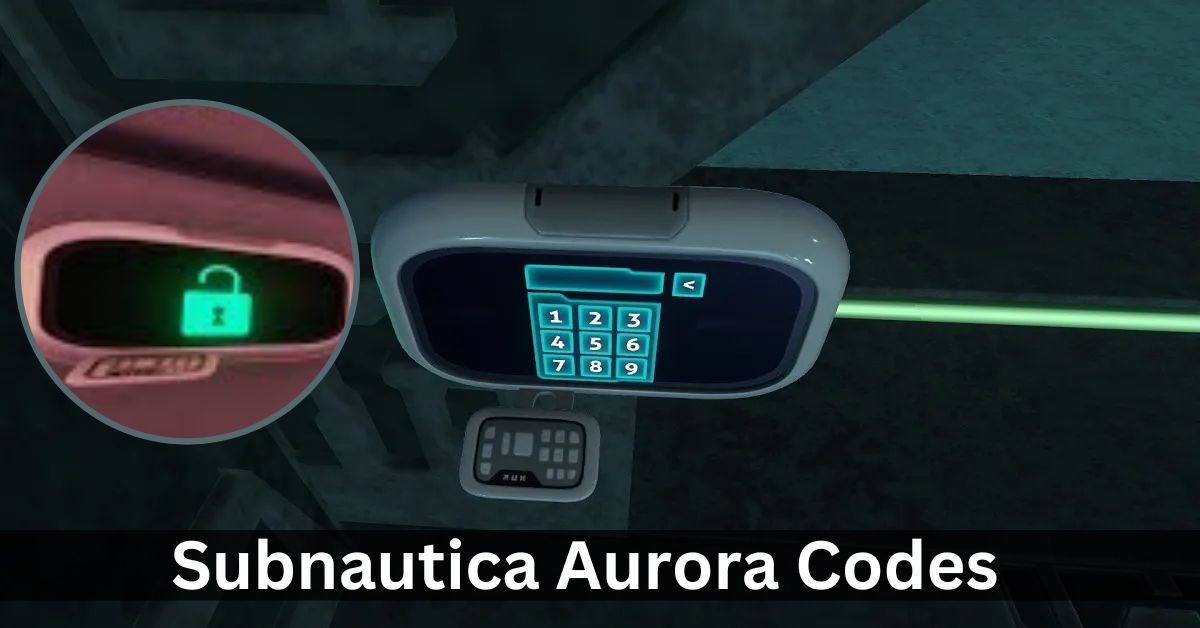
    In Subnautica, you’re stuck at the bottom of the ocean in the Aurora, a broken-down spaceship. Most of the doors have closed and locked during the crash and the shutdown procedures that followed. You, as the player, need to open each door so that the game can slowly show you what it’s all about.

    But did you know that in Subnautica, you can get to all of these places right at the beginning of the game by using door codes? We’ve listed all of the Subnautica Aurora codes below, along with the doors they open. You can use these at any time during the game, but some people might think that’s cheating, so you decide.

    Subnautica Aurora Codes

    These codes enable complete exploration of the Aurora and are required for unlocking the doors to various rooms. They can be collected via the in-game PDA data. The aurora door codes are:

    Door Code
    Captain’s Quarters 2679
    Cargo Bay 1454
    Robotics Bay 6666
    Cabin No.1 1869
    Lab Access 6483

    With this information, you are now prepared to explore the Aurora on your own, discovering every nook, hallway, and secret room, as well as investigating all conceivable fragments, in order to eventually unlock the Prawn Suit and Seamoth.

    What is the Purpose of Subnautica Aurora Door Codes?

    Subnautica codes are used to access the Aurora craft’s numerous entrances. The majority of codes can be found simply playing through the plot, although knowing each door code ahead of time can make life much easier.

    By going into each door aboard the Aurora ship, you can acquire upgrade materials and other useful stuff sooner. This also offers tools for accessing additional regions of the game earlier than you should.

    Using the door codes early in the game does not disrupt the game in any way; it simply provides you with a good early advantage to aid in your survival.

    Subnautica Aurora Codes
    Subnautica Aurora Codes

    You might also like to read about these other gaming guides articles:

    How to Get Aboard the Aurora?

    It’s worth noting that in order to board the Aurora in Subnautica, you must first wait for the engine to blow. This happens after a few in-game days, after which people are able to explore it.

    The Aurora ship may be found on the far east side of the map and is best observed by heading to the water’s surface.

    Once you’ve located it, you should put on a Radiation Suit. Simply said, if you don’t have one, you won’t be able to explore the ship.

    • Radiation Suit-Due to the amount of radiation emitted by the spacecraft, a radiation suit is required to explore the Aurora.
    • Repair Tool – This will assist you in repairing the Drive Room and any broken doors on the Aurora in Subnautica.
    • Laser Cutter – Using the laser cutter, you will be able to enter several areas, including the Prawn Suit Bay and the Black Box Terminal.
    • Survival Knife – Useful for dispatching any remaining bleeders.
    • Propulsion Cannon / Repulsion Cannon – Either of these can be used to remove crates and obstructions, particularly those in the main corridor and Laboratory door.
    • A weapon – to deal with any Cave Crawlers. This could simply be the Propulsion/Repulsion cannon you use to clear obstructions on the Aurora.
    • A Seaglide – You’ll need one of these to navigate the Aurora’s submerged passages in Subnautica.

    Subnautica relies on Aurora exploration to reveal vital resources after a core explosion. A Radiation Suit and door codes are needed to unlock various rooms. Codes obtained in-game or known beforehand speed up access to crucial supplies. With the correct gear, adventurers can explore the Aurora’s mysteries after the explosion, enhancing their survival narrative in this aquatic abyss and making each code a portal to faster exploration and survival.

    We love hearing from our readers! If you have any questions or comments, please feel free to contact us on Game Empress.

  • How To Escape Prison In BitLife? Unveiling The Best Kept Secrets Of 2023

    How To Escape Prison In BitLife? Unveiling The Best Kept Secrets Of 2023

    This guide tells you everything you need to know to get out of any Bitlife prison or jail map. There are jails in the game, too, in case you choose to go the wrong way and break the law. There are prisons with low to medium security, prisons with maximum protection, and prisons with regular security.

    You will go to jail based on the crime you commit. However, no one likes being locked up in either of these places, so you will want to get out. It’s not easy to get out of jail, though. This is why we have put together all of Bitlife’s jail maps and ways to get out of jail.

    How to Escape Prison in Bitlife?

    In Bitlife, here’s how to get out of jail:

    • You and one other security guard are both on the grid.
      He’ll move twice for every move you make.
      He won’t just make two moves in any direction; he will start horizontally and move toward you.
    • If the guard sees you trying to get away, they will add a few more years to your term for trying to get away.
    • To get out of jail in BitLife, you need to block the security guard in the maze walls so that he can’t move as freely.
    • In Bitlife’s jail, there will be three-sided boxes that he can get stuck in, and you can quickly get to the way out.

    Are Some BitLife Prison Escapes Impossible?

    Sometimes, it may seem impossible to get off the jail maps in BitLife, especially if you get stuck on a Maximum Security map. But any player can get out of any area.

    You need to be innovative and know how to use your moves because each plan has three-sided boxes or walls. You should use these walls to catch or at least slow down the guards so you can get away.

    How Many Riots Does It Take To Escape Prisons In BitLife?

    When it comes to riots, it’s not so much how many there are as how many prisoners players can capture. At the top, it will show how many prisoners are needed to start a riot. This number will go up every time the player starts a riot.

    Players can get out of a jail map during any riot, but especially after one. But riots can only happen once a year, and if the player fails to start one, other prisoners will probably beat them up.

    Players who get hit by these attacks will lose health, and if they run into a guard, they may be charged. The player could also get a longer sentence if they are found trying to start a riot.

    It’s not the best way to get out of jail, but players may be looking for this method to get a special award. In BitLife, getting away during a fight is entirely random, so players who choose this method will be really taking a chance. But if you want to get a unique title, it might be worth the trouble.

    Now you know everything you need to know about How To Get Out Of Prison In BitLife. You can also read our guide on the Roblox PS5 Release Date to get the most up-to-date information on the game’s versions and modes. Make sure you check GameEmpress.com often to get the newest gaming stories and guides.

  • Teardown System Requirements: Can Your PC Run It?

    Teardown System Requirements: Can Your PC Run It?

    Teardown is a game that combines sandbox, puzzle, and action elements. It was created and published by Tuxedo Labs. In the game, you play as the owner of a struggling demolition company who gets caught up in a questionable job.

    The story involves navigating between helping the police and taking on more questionable tasks. With its realistic physics and detailed environments, it’s no wonder that gamers are keen to dive into this interactive world.

    However, to ensure a smooth gaming experience, it’s essential to have a system that meets the game’s requirements. This article outlines the minimum and recommended system requirements for playing Teardown on a Windows PC.

    Minimum System Requirements

    Components Minimum Requirements
    Operating System (OS) Windows 7
    Processor Quad Core CPU
    Memory (RAM) 4 GB
    Graphics Card NVIDIA GeForce GTX 1060 or better
    Video RAM 3072 MB
    DirectX Version 11
    Free Disk Space 500 MB

    Recommended System Requirements

    Components Minimum Requirements
    Operating System (OS) Windows 10 (64-bit)
    Processor Intel Core i7 or better
    Memory (RAM) 4 GB
    Graphics Card NVIDIA GeForce GTX 1080 or better
    Video RAM 8192 MB
    DirectX Not specified
    Free Disk Space 500 MB

    Teardown Gameplay

    Teardown is a game where you break things. It’s a blocky game where you can smash anything using tools like explosives and vehicles. The main part has 40 levels. Each level tells you to steal or break specific things. You must finish in time using your tools. You can also play Sandbox Mode. It lets you do more without any time pressure.

    Teardown’s Extensive Mod Support

    Teardown System Requirements
    Image Source Steam

    The game Teardown is known for its extensive mod support, which could potentially require additional system resources depending on the mods used. It also supports a built-in level editor, Lua scripting, and Steam Workshop integration, allowing players to create or download additional content, which could also impact system performance.

    This is everything you need to know about Teardown System Requirements. Additionally, you can check our guide on Borderlands 3 System Requirements and Dead Island 2 System Requirements. Stay connected with GameEmpress.com to get the latest news and guides about the gaming world.